Rebecca's Raspberry Pi Powered Pet Feeders

Or, how to massively over-engineer dumping cat food into a bowl.

As with many of my projects, it started with something that made me angry. In this case, it was this: The Petmate Le Bistro Pet Feeder.

Okay, let’s back up a little bit. Back to about 8 or so years ago. We had a cat at the time, Pumpkin, who as objectively not a good cat. She was foul tempered on the best of days and very difficult to love. But she was my wife and I’s first pet, so we did love her all the same.

She had a habit of wanting food precisely on time. And if it was late, she would raise all manner of noise until she was fed. Often this came at some ungodly early time in the morning. So I bought a Petmate Le Bistro Pet Feeder.

Let Me Count The Ways This Thing Sucks

First of all, it is very nearly impossible to program this thing. It may have the worst UX of any consumer product I have ever encountered. The controls on it do not make sense and are not labeled in any such way as to indicate how to program it. And if you lost the manual (as I did), you’re on your own. Thankfully, some kind soul put the instructions on their blog because I would have been lost without it.

I’m a software engineer with nearly 20 years of experience, but programming this thing I’m reduced to one of those apes from the beginning of 2001: A Space Odyssey, banging on it with a bone until I get it to do what I want it to do.

And even worse, every time you change the batteries, it loses the program. It has no wiring for mains electrical or even an adapter, just D-cell batteries. And those batteries last just long enough for you to forget how you programmed it. So you’re back to square one.

Second, it loses time. Fast. On the order of minutes a week. So a 7am feeding becomes a 5am feeding within a few months. Every few weeks you have to reset the clock back to the current time. And that’s not including adjusting it for daylight savings time - which I usually never bothered to do because this thing is such a bear to deal with. My default setting was just to not touch it until I absolutely had to.

Third, and perhaps most importantly, sometimes it legitimately just would not work. You’d load it up with food and, when the scheduled feed time came, it would either just not feed at all, or do this wimpy thing where kinda tried to spin the motor for a fraction of a second. I even tried only filling it up halfway or a quarter of the way to see if maybe there was just too much weight on the motor. I tried taking it apart and cleaning it out thinking maybe a kibble got jammed somewhere.

But nope. About 50% of the time, it wouldn’t even feed my cats despite always incrementing the feed number. Which is a big deal if you’re relying on this thing to feed the cats while we’re out of town for the weekend.

This is literally one of the most garbage products I have ever owned. 0/10 do not recommend, and if you own one I suggest you set it on fire and mail the remains back to the manufacturer COD.

For the longest time, we just grumbled at how much it sucked and dealt with it. When we had to put Pumpkin down, I happily put it in the attic and was content to (hopefully) never have to think about it again.

So when we got two new cats last year, I at first resisted getting the Petmate back out. We just kinda made due by pouring food out in the mornings and evenings. But then we noticed our cats were gaining weight. Too much weight, in fact, because they were overeating. We really needed the ability to feed them on a schedule, a controlled portion to keep them at a healthy weight.

So I grumbled, and got the Petmate back out of the attic. And, imagine that, it still sucks just as much as it ever did. So I started thinking. This thing isn’t that complicated. It’s just a motor and a microcontroller. It can’t be that hard to build a better one.

So Let’s Build A Better One

Before this project, almost the entirety of my professional experience has been in software. I’ve built computers from components, done some wiring, but never built a custom piece of hardware. So this seemed like a good chance to learn.

My first thought was just to take the current one, gut it, and use it’s innards with a Raspberry Pi to make it suck less. But I quickly concluded this was probably not a good idea based as many of the components inside were custom. So, like any good engineer, I decided to build my own. :)

When I started, I had two big goals I needed to meet:

  1. It had to work. It had to reliably feed my cat, on time, every time.

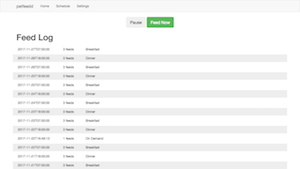
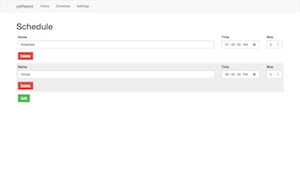
  2. It had to be easily programmable, preferably from a phone or laptop. Easily programmable to the point where my wife could do it if she had to.

After search around for awhile (pet feeders are a pretty common first hardware project, so there are lots out there to choose from), I decided to base my design on this one, but with some modifications and a completely different software program. I also modified the design pretty heavily because, well, I want it to look nice in my house.

The end result is this:

Software

I have open sourced the software I wrote for this project under the name petfeedd. It is available on Github. It implements a multi-threaded daemon (I said this was overengineered :P) that operates all facets of the feeder. petfeedd provides:

  • A web interface for “programming” your feeder, that allows an arbitrary number of feeds of an arbitrary size.

  • A RESTful API that can be used to write third-party clients.

  • An auto-discovery protocol that can be used to find feeders on your network. Useful for writing third party clients.

  • A notification system that supports email, PushBullet and Twitter.

petfeedd is implemented predominantly in Python 3 using Flask and Peewee, with Vue.js and Bootstrap used for the web interface.

Parts List

Tools

  • A drill (a drill press will make things much easier if you have one)
  • A screwdriver (an electric screwdriver will make things much faster)
  • A saw (a table saw will make things much faster)
  • Optionally, paint brushes if you are going to paint it
  • 1/4” spade bit
  • 3/8” drill bit

Online

Your Hardware Store

  • 1 thin piece of wood
  • 1 1/4” Dowel (usually back with the stairs and fence components at Home Depot)
  • 1 1” Dowel
  • 1 2” Carriage Bolt or Machine Screw with nut
  • 1 4” Carriabe Bolt with nut
  • Plastic or rubber washers
  • Metal washers
  • 2” PVC 45-degree elbow
  • JB Weld Epoxy
  • A small disposable spatula (get these in the paint department)
  • 2” Masking Tape
  • Wood Glue
  • Optionally, paint, if you are going to paint it

Your Craft Store

  • 1 Plaque of your choosing (I used this one).

Step 1: Building the Rotator Arm

Start by taking apart the food dispenser. Throw away or recycle the base (we’re not going to need it). Take the knob off and recycle it too. Take the spinner out of the dispenser and look at it. Notice the little notch in the spinner? We need to carve down our 1/4” dowel until it fits in there snugly. I just used a pocket knife for this.

Next, take your small thin piece of wood. I used a hole bore for this but you could just as easily just cut a square piece off of it. Whatever it is, it should be square or round, with a hole as close to the center as you can possibly make it. This hole should snugly fit the dowel you just made.

Trim the dowel down so that it’s as close to the body of the dispenser as you can make it. You you should end up with something that looks like this:

Apply some wood glue and push the dowel in. Allow it to set overnight.

Step 2: Building the Body

First, take note of how the dispenser body is shaped. One side has a small notch and the other side doesn’t. The side with the notch will be our “back.”

Take the PVC piece. In the top back of it, drill a hole big enough for your 4” carriage bolt. Feed your 4” carriage bolt, a rubber washer and a metal washer through the hole, and put another rubber washer on the other side. You should end up with something like this.

Now, on a scrap piece of wood, squirt a small amount of epoxy, about the size of a half dollar, onto the wood and mix together using a spatula. Best to do this outside because this stuff smells awful. Using the spatula, gently apply a quarter-inch bead of epoxy around the outside bottom of the dispenser body. Press the PVC onto the feeder, with the carriage bolt facing backwards and in line with the notch and the hole for the spinner, and tape it into place. Allow it to cure for at least an hour.

Step 3: Building the Mount

Take your 1” dowel and cut two pieces off of it. One 1” piece, and one 3” piece. These will be the pieces that connect the dispenser body to the base. Take your small piece of wood and cut a 1” piece off the end. Then cut this into two smaller pieces. This will hold the servo in place.

It is 8” from the bottom (larger) to the top (smaller) dowel, center to center. So on your plaque, mark the centerline, then the bottom and top locations. The servo pieces will go 1.5” above the bottom dowel location.

Apply a small amount of wood glue and press the dowel pieces onto the board. Now, take your servo and center it on the line one inch above the bottom dowel you just glued, and press the two small wood pieces you have on either side. Mark their locations using a pencil, take the servo out, apply wood glue and glue the pieces in. Your end product should look like this:

You can optionally use clamps to hold them if you have them, but I didn’t find this necessary. Allow it to set overnight.

Optional Step 3b: Paint

If you are going to paint, now is the time to do it. This is what mine looked like after two coats of paint.

Step 4: Assembling the Feeder

Now, all the pieces are done, it’s time assemble the feeder. Take your 1/4” spade bit and drill a hole right down each dowel all the way through the back of the plaque. This is where having a drill press would be very helpful because it’s hard to drill a perfectly straight hole using a hand drill.

Flip the plaque over and, using a slightly larger drill bit, drill out just enough on the back of each hole to hold the bolt. I put a little wood glue in to hold the bolt in place, but you don’t have to do that.

Additionally, drill two small holes through the plaque at the top and bottom. These are how you will mount it on the wall.

Put 4” carriage bolt hanging out of the back of the feeder through the bottom dowel all the way through the back. Center the entire dispense on the plaque and, using a sharpie, mark the point where you’ll need to drill a hole in the top part of the dispenser.

Carefully drill a hole through the plastic dispenser body at the location you just marked. Do not apply too much pressure or you will crack or break the dispenser. Now, test putting everything together. If it looks like this, you’re good to go!

Step 5: Attaching the Servo

Take the rotator arm you built in step 1. Your servo should have come with some plastic attachments. I used the X-shaped one. Using the included screws, attach it to the back of the rotator arm. You need to try to get it as close to the center as you possibly can. Some wiggle room is OK, but you don’t want to damage the servo.

Step 6: Prepare the Raspberry Pi

Install Raspbian on your Raspberry Pi.

  • apt-get update && apt-get upgrade
  • Reboot
  • raspi-config and configure to your liking. Pay special attention to the wireless network settings, locale settings (including timezones) and enable SSH.
  • Edit /etc/wpa-supplicant/wpa-supplicant.conf and configure your wifi.
  • Edit /etc/network/interfaces and give your wifi a static IP.
  • Reboot. Unplug the network cord and be sure you can now reach it by wifi.
  • apt install git python3 python3-pip python3-gpio libxml2-dev libxslt1-dev
  • pip3 install pipenv RPi.GPIO gpiozero

Follow the instructions for installing the open source code I wrote for this project (available on Github) petfeedd.

Step 7: Mount the Raspberry Pi Case

Assemble the entire feeder, including the servo. There should be enough room to put the Raspberry Pi case (don’t forget to put the top on it) between the plaque and the back of the dispenser, above the servo and about an inch below the top dowel. Put it in this spot and screw it down. Mount the Raspberry Pi inside the case and put the middle part (but not the top part) on.

Step 8: Wire the Raspberry Pi

For the Raspberry Pi, you’ll want to reference this diagram. Your servo has 3 wires: white, black and red. Red is power, black is ground, and white is control. So using your male-to-female jumper wires, connect pin 2 (DC 5v) to the servo’s red wire. Connect pin 6 (ground) to the servo’s black wire, and connect pin 11 (GPIO17) to the servo’s white wire. At this point, it’s probably a good idea to quickly test the servo using a bit of code:

from gpiozero import Servo
from time import sleep

servo = Servo(17)
while True:
    servo.min()
    sleep(1)
    servo.mid()
    sleep(1)
    servo.max()
    sleep(1)

If your servo spins, you’re good to go. If not, double check your wiring. Then, push as much of the extra wiring as you can into the top of the case and put the top cover on, hiding the additional wiring.

Step 9: Putting it All Together

So now it’s time to mount your feeder! Unscrew the top carriage bolt, lift up and remove the servo temporarily but allow it to be connected.

Put the bottom carriage bolt (the 4” one) all the way through the plaque and screw it into the bolt. It doesn’t have to be tight, just firm. Then, spin the feeder to the side allowing you to access the mounting holes you drilled.

Using a stud finder, find a stud near an electrical outlet where you want to mount your feeder. Sink a screw into the top and bottom of the plaque, firmly mounting it to the wall. Now, put the servo back in position, rotate the feeder back up and screw in the top carriage bolt. Congratulations, your feeder is now ready!

Step 10: Testing

Plug in the Raspberry Pi. Fill your feeder with cat food and put a bowl beneath it. On a device, go to the IP address of your feeder on port 8080 (by default). petfeedd takes about 10 seconds to start, so if it doesn’t respond immediately, try again. You should see a big button that says “Feed Now”. Press it. If your feeder dispenses food, you’re done, and can now program your feeds.

Optional Step 11: Pretty URLs

As I have a long standing obsession with pretty URLs, typing http://172.16.104.20:8080 is offensive to me. Fortunately, we can fix that with some nginx proxy hackery.

  1. apt install nginx
  2. vi /etc/nginx/sites-enabled/default

     server {
         listen 80 default_server;
         listen [::]:80 default_server;
         root /var/www/html;
         server_name _;
    
     	location / {
     		proxy_pass http://localhost:8080;
     	}
     }
    
  3. sudo systemctl restart nginx

Now, assuming you made an internal DNS entry, you could type something like: http://kitchen.feeder.example.com. A bit longer, but easier to remember. I have enough stuff bouncing around in my head every day to remember IP addresses.

Epilogue

I probably could have done something different. There are any number of feeders available on the market now that weren’t available when we bought the Petmate. But this project was about learning as much as it was about the end product. For the first time in my life, I built a project completely from end to end, hardware and software, and I learned a lot about how electronics works as a much lower level than I’ve dealt with for much of my life.

If you ask many people who work in tech, and especially software engineers, they all have a “moment” when they realized what kind of power they possessed. The first time the code they worked on did something. The first time they automated a task their peers spent hours on. Things like that. Every programmer has those moments, and that rush of building something and seeing it work.

I felt that rush again the first time I watched my feeder dispense food. And since then, my cats have been fed precisely on schedule every single day. It hasn’t missed a beat.

There are a few things I’d like to improve. For one, Raspberry Pis don’t have an onboard realtime clock so, if there’s a power outage, they “lose” time until a network connection comes up and they can sync with NTP. This actually caused a problem one morning when we had a very-unusual 2 hour power outage, which was long enough to exhaust the UPS batteries that kept the wifi up. So when the power did eventually come back, the feeders came up before the wifi, had no idea what time it was, and missed a feed until they were reset. A RTC would have fixed that problem.

Other changes I would like to implement are a sensor to let me know when the food supply is getting low. This is not a major problem because both our feeders are in high traffic areas, but it would still be nice to know. And maybe the ability to send feeds by SMS, Telegram or something like that.

But overall, these are a dramatic improvement over the garbage Petmate feeders. They just work, which is what I want. And if they ever stop working, since I built them my chances of figuring out what’s not working are pretty high.

All in all, this was a pretty fun project, and my cats are very happy to have a regular food supply now.

Up next: using an ESP8266 NodeMCU to control my mini-split. :)

Update January 2019

An updated release of petfeedd is available that fixes some issues people were having with the installation. See the announcement for more information. Namely, Docker images are now available that should make installing and running petfeedd literally 3 commands.

Update February 2022

A beta release of petfeedd version 1.0 is now available. The software has now been entirely rewritten in NodeJS and now supports a much, much wider set of functionality. See the announcment for full details.

Update March 2022

petfeedd Version 1.0 has been released. See the announcment for full details.

Update March 2024

I no longer use these pet feeders. They were a great homebrew solution for awhile when there were few alternatives, and provided seven years of great service. But these days, there are any number of smart pet feeders on the market, and I have moved on to other things. I am leaving this up as a community resource, well as petfeedd, but will not be doing any further work on it.

Comments (0)

Interested in why you can't leave comments on my blog? Read the article about why comments are uniquely terrible and need to die. If you are still interested in commenting on this article, feel free to reach out to me directly and/or share it on social media.

Contact Me
Share It
Release Announcements
petfeedd users, I am proud to announce the beta release of petfeedd 1.0.1. This release has no major changes in it and is solely about addressing security issues in many of the underlying libraries used by petfeedd. To install it or upgrade from previous versions, you can simply run: docker pull peckrob/petfeedd:latest
Read More
Release Announcements
After five beta releases and months of testing, I am happy to announce petfeedd Version 1.0 is now available. All changes from the beta branch have been merged in and the release is now available on Docker Hub. To install it or upgrade from Version 0.2, you can simply run: docker pull peckrob/petfeedd:latest And restart. It should perform all the upgrades needed for version 1.0.
Read More
Release Announcements
petfeedd users, I am proud to announce the beta release of petfeedd 1.0. It’s been almost three years since the last release of petfeedd (version 0.2.2), and Version 1.0 marks a new start for this project. I have been running the beta release on my feeders for the last week and I believe I have smashed all the major bugs.
Read More