Digitizing Two Hundred Cassette Tapes

This is an old post!

This post is over 2 years old. Solutions referenced in this article may no longer be valid. Please consider this when utilizing any information referenced here.

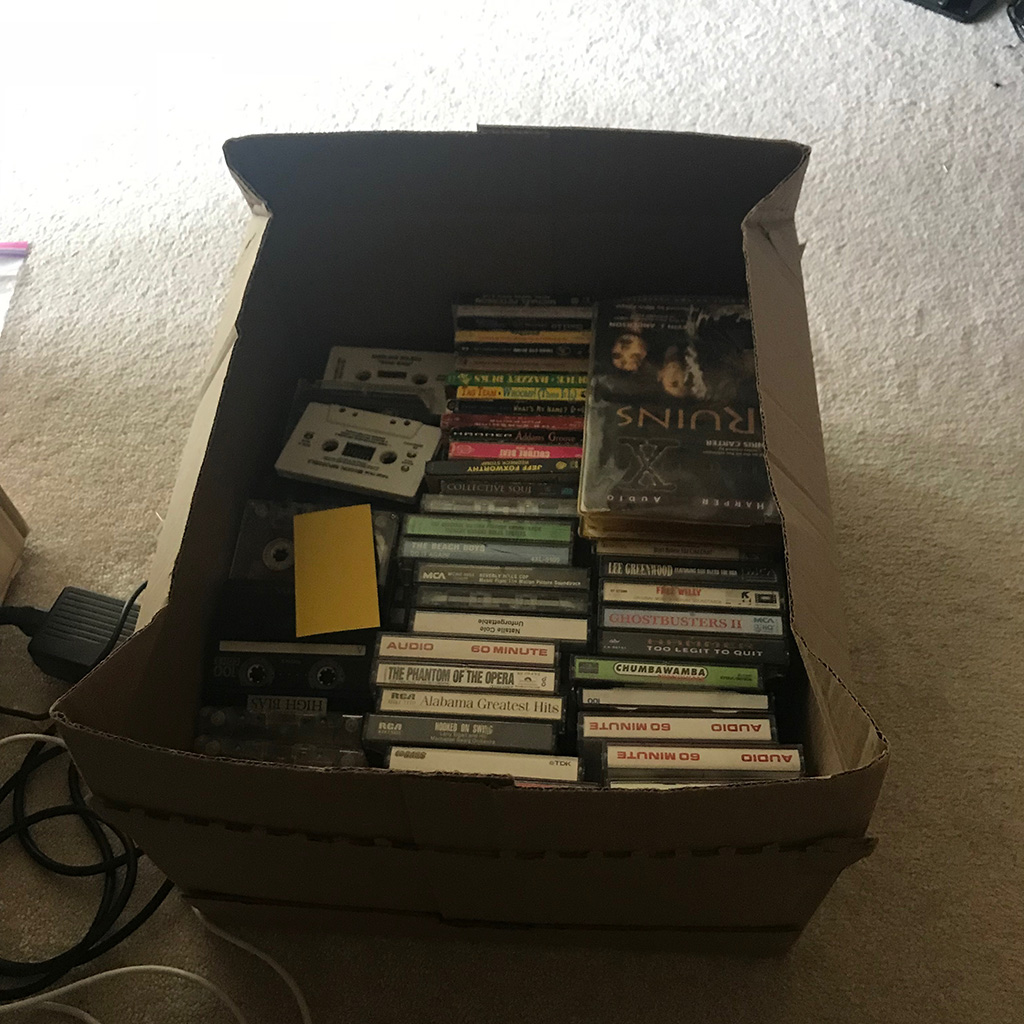
Like most people who grew up in the 80s and 90s, I had a pretty large collection of cassette tapes. But probably unlike a lot of people, I’ve managed to hang onto them, or at least a lot of them, over the years. This big box of tapes has traveled with me through probably a dozen moves over the years, and it’s always been in the back of my head, “I should probably digitize them.”

The thing was, I had a bunch of cassette albums, sure, but most of them I eventually replaced with CDs and later ripped to MP3s. But I had a ton more of mix tapes and TV recordings.

For those who don’t remember or weren’t born during the cassette era, a mixtape was a home produced mix of songs you liked. Much like we do today with iTunes playlists, we did in the 80s and 90s with cassette tapes. The homebrew way was to just have a cassette recorder and a player next to each other and try to keep the room really quiet, but later on dual cassette boom boxes were available that make making mix tapes really easy.

The other thing I had were a ton of TV recordings. I would record some of my favorite TV shows on cassette, then I could listen to them anytime and anywhere. It was a bit like an early podcast!

So I had this box of about 200 cassette tapes, and I finally decided this year it was time to tacle the digitization project before they degraded any further. So here are some lessons I learned while doing this project.

Equipment

I don’t own anything capable of playing cassettes anymore. My last cassette capable device (a shelf system) I got rid of some time ago. So my first step was to aquire a cassette deck.

I was looking for a cassette deck with RCA outputs and auto-reverse. If you are going to tackle a project like this, you will need something capable of auto- reverse. This means that when it reaches the end of the cassette, it automatically flips sides and starts playing the second side. This will save you a lot of time and effort especially if you are doing parts of this unattended. Having a deck with “smart skip” functionality (where you can fast forward through songs and stop at the gaps) is another very helpful function to have.

I was hoping to find one that has variable speed control. If I could output at 2x and then slow it back down using software that would have made this project even faster. But these days beggers can’t be choosers, so I had to go with what I could find.

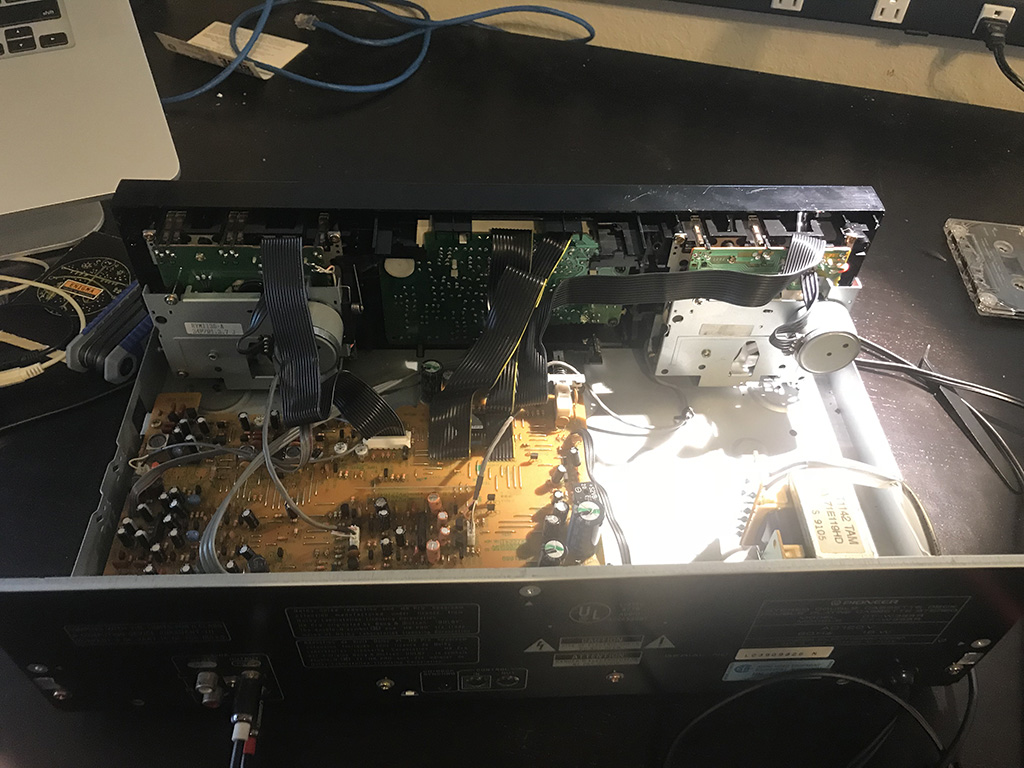
I asked on Facebook and one of my friends had a deck he wasn’t using anymore that he lent me. You can also hit Craigslist, Facebook Marketplace, etc. Just be aware that cassette decks are starting to be hard to come by so, if you are considering tackling a project like this, I would suggest not waiting too much longer. So I ended up using a Pioneer CT-W355R for this.

When my friend sent me his old deck, it ended up needing a bit of work. This is not surprising. Ask anyone who repairs old equipment, it’s bad news for these old mechanical systems if they sit idle for long periods of time. In this case I ended up having to replace belts on both sides of the deck. Fortunately, both types of belts (four in total) were still available and cheap. I think I spent about $20 on belts and a couple hours taking it apart, replacing the belts, cleaning, lubricating and putting it back together.

Also, be sure to clean the heads well. Back in the day we had “head cleaner” cassettes that would do it, but a Q-tip with rubbing alcohol works pretty well too. I ended up cleaning the heads several times throughout this process.

When I first got the deck working, I just ran the RCA out from the deck into the microphone port on my Mac. The first few recordings came out … okay, but not great. A lot could be done in post process, but it would be nice if I could adjust the levels and the mix during recording.

So I decided to spring for a relatively inexpensive small mixing board. I settled on the Behringer Xenyx Q802USB, because it had USB out on it. This was a major speedup, as I had less post processing work to do. Cost about $70, but it was worth it because it made things a lot easier and, if you have a large number of cassettes, I would highly suggest you get a mixing board to make things easier.

So the final flow was RCA from the cassette deck to third channel on the mixing board (via an RCA to 1/4” cable), then mixing board to iMac via USB.

For recording, I used Audacity. Audacity is great and is available free (it’s open source) for pretty much every platform. I would suggest getting the most recent version as it has some plugins that I will discuss later that will make this process much faster.

To select the mixing board for recording, on a Mac, the device is called “USB audio CODEC”.

Having a pair of studio headphones would be helpful, but not necessary. It’s useful for identifying what is on a tape. I used my pair of David Clark aviation headphones because they have the same 1/4” plug.

I Didn’t Digitize Everything

Okay, so I cheated a bit! :)

For the mix tapes, I listened to each cassette tape that I had. As I listened to it, I reconstructed a matching playlist in iTunes with the songs on it. 95% of the time the songs on my mix tape I already had in my library, and getting additional songs off Amazon to fill the holes was easy.

For the albums, I went through what I already had on CD and already in my iTunes library. From there, it was quick to go through what I already had and pare down what actually needed to be digitized. For albums that I could find digital copies of, I bought (which only ended up being one or two).

Doing this, I was able to cut the effort down to about 100 tapes.

Record In Long Takes

For my TV recordings, this was easy. Each was an hour on a self contained one hour tape. So after getting the levels right on the mixing board, which required a little bit of trial and error with each tape as they were all recorded at different times and with different settings, I would just let them run. I’d start a tape and then set a 59 minute timer on my phone.

When each one completed, I’d do a bit of post process work, mainly removing the blank areas at the beginning, middle and end of the tape. Each of these resulted in a 1-hour or raw recording.

Some of the albums I had I was not able to find digital or CD copies anywhere. So those were recorded in a single take and split up later using Audacity. I’d set an alarm on my phone for however long the tape was (usually the run time is either on the cassette itself or on the sleeve).

I had a few audiobooks as well. These were split across multiple tapes, which I combined into a single long recording. You could futher split these into chapters if you wanted to, but I decided not to.

I would try to do a bunch of recordings at once, then do a bunch of post processing at once. Unfortunately, Audacity cannot really multitask well. If it’s recording, that’s all it can do. You can’t record in one window and edit in another, or export while recording. One thing at a time. This was a major annoyance during this process, but one I learned to live with.

Post Processing

From there, depending on the recording, there might be more work to be done to clean it up. Sometimes it was a stereo recording that only had one side. Back in the day most cassette players had a “stereo/mono” switch that you could flip, or it just didn’t matter because you were listening on a boom box. But these days with listening in cars or on headphones, that would probably cause a headache. So I’d mix those down to mono.

Cassette tapes are not the best format for recording good sound quality. They were better than vinyl (and yes, I realize I’m inviting hipster wrath for this but it’s true) but still far inferior to CDs. There is a near constant background “hiss” on most cassettes that you can hear if you turn the volume up enough. In a lot of cases this is below hearing level so it doesn’t matter, but on some recording that may have been weakened by time, this becomes very evident.

So you may need to use a Noise Reduction filter in Audacity. This is a balancing act, because it also reduces the volume and fidelity of the recording. So play around with the settings a bit. I would never go above about 12dB noise reduction.

Other times the recording might have been very quiet. Some of this was alleviated by using the mixing board to amp up the volume. But even then, occasionally, you’ll need to use Audacity’s Amplify filter to bring the volume up further.

For long recording of albums that have clearly defined beginnings and ending, Audacity’s “Sound Finder” (under the Analyze menu) will save you tons of time. Fiddling with the settings will usually allow it to identify all of the tracks using labels, which you can then easily export once using File -> Export -> Export Multiple.

Editing ID3 tags in Audacity is not pleasant. So unless I was doing a simple export, I would edit the tags using another piece of software (usually Music Tag Edit.) Then, export to iTunes.

Identifying Music

For the most part, this is straightforward. Especially if you made notes of what is on your mix tapes. But if you didn’t, tools like Shazam can help you identify what you are listening to.

But I had some very esoteric tastes, and some of the things I would uncover sometimes would be very difficult to track down, even in the modern world where “everything” is online.

Occasionally, I’d come across a long forgotten gem. A song I had completely forgotten existed.

This song, the video - at least the first about 40 seconds of it - was distributed on a CD that came from some computer manufacturer. Microsoft multimedia? I came across this one day poking around the disc and thought it was pretty cool. I mean, a video on a computer? In pre-Youtube days that was pretty mindblowing. Even if it was only 40 seconds long, that 40 seconds showed a glimpse of the future.

It was never even identified who the band was, though.

At some point I added that 40 seconds to one of my mix tapes, as filler near the end. Discovered it again going through the tape, and some googling discovered the full video on Youtube.

So here it is. The Holidays - Octopus of Love. For the full 90s experience, play it through some cheap computer speakers and stop it at the 0:40 mark. :)

However, there were a few songs that I was never able to identify. There is literally no evidence on the Internet of them ever existing, which is bizarre.

Conclusion

The entire process took about about two months total, but I was only working it in the evenings and on the weekends. And the majority of that time I was not even actively doing anything, just waiting for a recording to complete so I could go on to the next one. Post processing usually took 10-15 minutes per recording, and exporting to MP3 another 5-10 minutes.

I was surprised at how well these tapes held up. They haven’t been stored in the best conditions over the years (they spent years in the attic, where temperatures in Alabama could reach dangerous levels in the summer). And many of them weren’t even “nice” tapes to begin with (I was a kid, so I wasn’t splurging money on nice tape, I was getting the cheap 6-pack from Walmart). But most of them were in good to excellent shape. Only about three were so degraded that I was not able to rescue something from them.

Now, at the end of the process, I can see why I delayed doing this for a long time - it was a tremendous amount of work. But I’m glad now that it’s done that I have digital copies of all of those old cassette tapes safely stored on my server.

At any time I can pull up one of those playlists on my phone and instantly remember being a kid, sneaking my walkman in my backpack so I could listen to music on the bus ride home. One of the more nostalgic recordings I found was just a recording of the top 10 countdown straight off the radio, commercials and all. I can totally remember listening to that every week in my room.

So, I guess the next big digitization project I need to tackle is my old VHS and Super-8 collection.

Comments (0)

Interested in why you can't leave comments on my blog? Read the article about why comments are uniquely terrible and need to die. If you are still interested in commenting on this article, feel free to reach out to me directly and/or share it on social media.

Contact Me
Share It
Randomness
I grew up in the 80s, against the backdrop of Michael Jackson’s music. I remember my parents listening to Thriller, Billie Jean, and Beat It. In many ways, Michael Jackson defined music in the 80s.
Read More
Music
This weekend in Atlanta, I had the chance to hear an extrodinarily talented musician. I want to give him major props for one of the best concerts I have seen in a long time. Matthew Ebel (you can buy/listen to his stuff on iTunes too) has a sound that is somewhere between Ben Folds and Billy Joel. If you like Piano Rock, or are just looking for something good to listen to, I highly suggest you check him out. I already bought all three of his albums.
Read More